Together with my DBA collegues we work on our Oracle skills by getting our hands dirty. To be able to practice all kinds of scenarios, everybody runs vmware with linux guests on their Windows laptop. For some time Oracle has a virtualisation solution with Oracle VM Server and we wanted to experiment with this product aswell.
Our setup consisted of Windows with vmware in which we run Oracle VM Server (OVS). In OVS we then create guests for our scenarios. Not really an ideal situation, due to the limited resources of laptops in general and also the unnecessary overhead. As a DBA I have a need/desire to remove unnecessary
resource consumption whenever possible. And I wanted to keep my original Windows install intact (which I need for my wireless connectivity).
Originally this was a small and simple instruction for me and my collegues in Dutch. Some sections have been removed/cut for not being relevant.
Setup/necessities
- laptop/machine prefferably with Hardware Virtualization capable CPU & BIOS.
- partition magic (not free, but easy to use) or parted (linux and free)
- downloads from edelivery.oracle.com
- Oracle VM Server (burn on a bootable cd)
- vmmanager iso
- DVD iso of Oracle Enterprise Linux 5 update 2 32 bit (V15098-10)
- templates (PVM's)
- ovm console plugin(http://oss.oracle.com/oraclevm/manager/RPMS)
- patience
Execution plan
This is the general plan for getting OVS running on a laptop with Windows already installed.
- activate Hardware Virtualisation in bios
- redefine partitions
- create dualboot configuration
- installation of OVS
- transfer ovs bootsector for dualboot
- installation of GUI in dom0
- installation of firefox
- installation OVS console plugin
1. activate Hardware Virtualisation in bios
Current laptop models have CPU's capable of running with Hardware Virtualisation. This gives some extra possibilities, like running guests without PV drivers (HVM's). Often HV is not enabled by default. Refer to your vendor's manuals on how to enter the bios to adjust this setting.
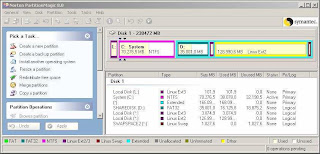
2. redefine partitions
To be able to boot OVS from the same internal disk, you need to create the boot partition within the first 1024 cylinders of the disk. As I had Windows already pre-installed I needed to juggle with my partitions. The trick is to create a small partition of 101MB at the beginning of the disk (cylinder 1). With Pmagic I moved my Windows partition (C:), to create the necessary space.
When installing OVS will try to create four partitions.
- /boot
- /
- /OVS
- swap
We already have one partition with windows (primary partition) and we need one primary partition for
/boot. If you let OVS do the work it will try to create all four partitions as primary partitions. This will fail as you can have only four primary partitions on one disk.
Solution: Create an extended partition, which can hold logical partitions.
I also created an extra FAT32 partition as a shared disk between my Windows and OVS installation. This could have been NTFS, but writing on an NTFS partition from Linux seems not to be stable enough yet (this is not verified by me, btw).
3. create dualboot configuration Edit your c:\boot.ini and add the bold line as shown below.
[boot loader] timeout=30 default=multi(0)disk(0)rdisk(0)partition(1)\WINDOWS [operating systems] multi(0)disk(0)rdisk(0)partition(1)\WINDOWS="Microsoft Windows XP Professional" /noexecute=optin /fastdetect
c:\ovs_boot.dos="Oracle Virtual Server"
4. Installation of OVS Boot your laptop from the OVS boot cd.
In the bootscreen just hit [enter]
When you get the question to select a partiotn layout choose: use all empty partitions.
PS: If you get errors stating there is not enough room, you probably didn't create the extended partition.
When asked where to write the bootloader, DON'T select MBR!!! Select to write bootstrap on linux bootpartition.
When OVS has installed it will want to reboot. Now you need to boot from de OVS cd again!
5. transfer OVS bootsector
You rebooted from the OVS cd again, right? Good! We created a second OS, but we can't boot to OVS yet. We need to get the bootsector onto the Windows bootpartition as a file.
Linux to the rescue! As we booted from the OVS cd, we have the option of starting linux right from cd.
On the prompt type: linux resuce
network: not needed
mounting system image: choose 'skip'
When linux has finished booting, we need to identify two partitions
1> source: /boot partition of OVS (it starts with cylinder 1)
2> the Windows boot partition (or FAT32 partition) to write the bootsector to
#Use fdisk to print the partition table
fdisk /dev/sda
p
#Create a mountpoint to mount windows partition
mkdir /mnt/share
mount /mnt/share
#Extract bootsector to file
dd if=bootpartition bs=512 count=1 of=/mnt/share/ovs_boot.dos
#we can now reboot again (remove the cd)
exit
If you didn't create ovs_boot.dos directly onto the c: partition, you need to boot into Windows and copy ovs_boot.dos to c:\
You should now be able to boot directly to OVS.
When booting to OVS, you get five boot options. Just select the default which is probably xen-64 (third option).
6. Installation of GUI in dom0
When you have booted into OVS, you should now be on the console. Log onto the console with root/ovsroot.
In linux the GUI consist of X11 and a desktop manager like Gnome or KDE. We will install Gnome. The packages to install these products are located on the Oracle Enterpise Linux 5 update 2 DVD iso image, so we need to mount it.
#create mountpoint & mount iso
mkdir /mnt/cdrom
mount pathto/dvd_el5u2.iso /mnt/cdrom -o loop,ro
We don't want to use rpm to install all the required packages, because it doesn't resolve dependencies for you. That's what yum is for. Before we can use yum, we need to setup a yum repository. This is a file with a reference to some xml files on the DVD image.
cd /etc/yum.repos.d/
vi EL5.repo
Contents of EL5.repo
[EL5u2]
name=Oracle enterprise Linux 5
baseurl=file:///mnt/cdrom/Server
We need to import a key to make yum work properly.
rpm --import /etc/pki/rpm-gpg/RPM-GPG-KEY*
Now lets install all required components.
yum groupinstall "X Window System"
yum groupinstall "GNOME Desktop Environment"
7. Installation of firefox
Installing firefox canbe done with rpm.
rpm -ivf /mnt/cdrom/Server/fire*.rpm
8. Installation of OVS plugin
This plugin will enable you to logon to the console from the vmmanager webinterface.
#dependency: install package from EL5u2 DVD iso
rpm -ivh /mnt/cdrom/Server/m4*.rpm
#install plugin
rpm -ivh /ovm-console-1.0.0-2.i386.rpm
cp /opt/ovm-console/etc/mozpluggerrc /etc/
cp /opt/ovm-console/bin/* /usr/bin
9. starting GUI
You can now start the GUI
startx
10. play!
Exercise: Create a VM and install vmmanager.
Have fun! Any comments are welcome.
regards, Tony
